
Hand-filing a chainsaw chain looks intimidating the first time you try it, but it’s genuinely one of the most useful skills a chainsaw owner can pick up. No shop trips, no waiting, and once you’ve got the technique down, it takes just a few minutes.
Let’s walk through exactly how to do it properly, from choosing the right file to the actual filing motion that keeps every cutter consistent.
This is a completely standard maintenance skill, no different in spirit from checking your own oil or tire pressure once you know the steps.
By the end of this guide, you’ll have a genuinely complete picture of proper filing technique, not just a vague sense of “file the teeth until they look sharp.”
Quick Answer: Match Your File, Set Your Angle, File Consistently
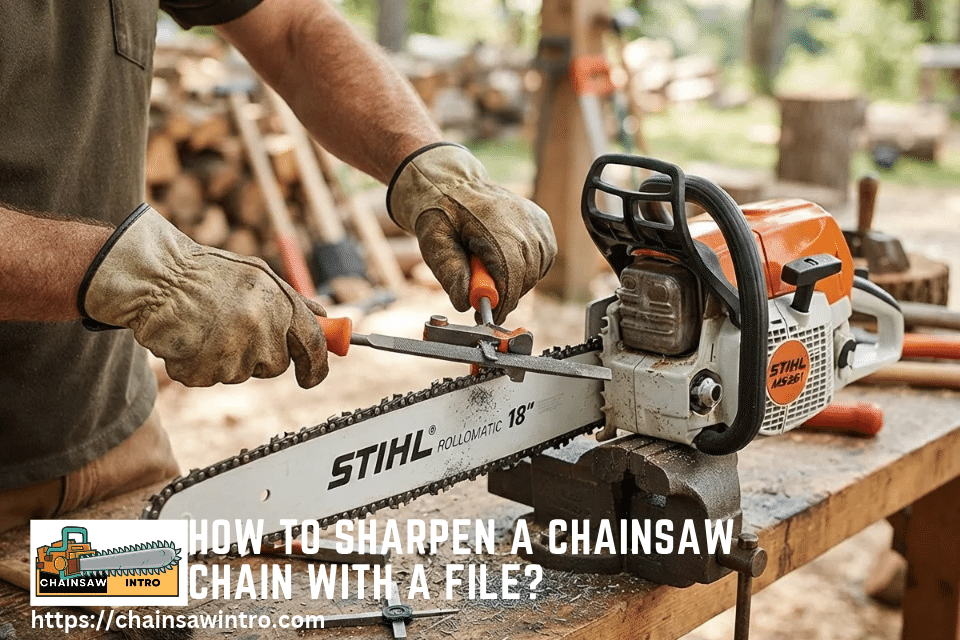
Sharpening a chainsaw chain with a file involves selecting the correct round file diameter for your chain's pitch, using a filing guide to maintain the proper angle, and applying consistent strokes and pressure across every cutter. The technique matters more than speed — consistency is what actually determines your results.
What You’ll Need
Gather these before starting, since having everything ready makes the process much smoother:
- A round file matched to your chain’s specific pitch
- A file handle to grip the file securely
- A bar-mounted filing guide, which helps maintain consistent angle and depth
- A depth gauge tool for periodically adjusting the rakers
- Work gloves
- Your saw, either mounted on the bar with the chain brake engaged, or secured in a vise if working off the saw
Choosing the Correct File Size
This detail genuinely matters more than people expect, since an incorrectly sized file produces poor results regardless of technique.
- File diameter is matched specifically to your chain’s pitch, not chosen arbitrarily
- Common pitches each correspond to a specific standard file diameter, listed in your chain’s packaging or manufacturer’s specifications
- When properly positioned in the cutter’s gullet, roughly a fifth of the file’s diameter should sit above the cutter’s top plate
If you’re not sure which file size matches your chain, check your chain’s packaging or your saw’s owner’s manual before starting, since guessing here undermines the whole process.
A file that’s too small won’t properly reshape the cutter’s profile, while one that’s too large can damage the cutter or produce an incorrect angle entirely. This is genuinely one detail worth getting exactly right before you make a single stroke.
Step-by-Step: Filing Each Cutter
- Disconnect the spark plug wire or remove the battery, then put on gloves before handling the chain.
- Secure the saw, either with the chain brake engaged on the bar, or with the chain clamped in a vise if working off the saw.
- Identify the shortest, most worn cutter on the chain, which becomes your reference length for every other cutter.
- Position your filing guide on the bar, aligning it over the first cutter you’ll sharpen.
- Place the file in the cutter’s gullet, following the guide’s angle markings, typically in the 25 to 35 degree range depending on your chain type.
- File using smooth, consistent forward strokes, pushing the file away from you across the cutter.
- Lift the file away from the cutter on the return stroke, rather than dragging it backward.
- Use the same number of strokes and consistent pressure on this cutter, then move to the next one in the same direction around the chain.
- Once you’ve completed every cutter on one side, reposition yourself or the guide to address the cutters facing the opposite direction.
Take your time matching stroke count and pressure across every single cutter — this consistency is what actually determines whether your chain cuts straight and evenly afterward.
The Filing Motion: Push, Don’t Drag
This specific technique detail is worth its own explanation, since it affects both your results and your file’s lifespan.
- Files are designed to cut effectively in one direction, typically the forward push stroke
- Dragging the file backward across the cutter on the return stroke can dull the file faster and create inconsistent results
- Lifting the file clear before returning to the starting position preserves both your file and your filing consistency
This small adjustment in technique makes a genuinely noticeable difference in how long your file stays effective and how consistent your results turn out.
Think of it the way you’d think about a handsaw or a woodworking chisel — the cutting action happens in one specific direction, and working against that direction on the return stroke just wears down the tool faster without adding any benefit.
How to Maintain Consistent Angle and Pressure?
This is really the heart of good filing technique, more important than raw speed or even file selection.
- A bar-mounted filing guide is the most reliable way to maintain consistent angle without relying purely on freehand judgment
- Counting your strokes per cutter, and consciously applying similar pressure each time, helps prevent one side of the chain from being filed more aggressively than the other
- Inconsistent filing is one of the most common causes of a chain that cuts crooked afterward
If you take away just one lesson from this whole guide, let it be this: consistency across every cutter matters more than perfection on any single one.
Don’t Forget the Depth Gauges
This step doesn’t happen every single sharpening session, but it’s essential every few sessions to maintain proper cutting performance.
- As cutters get filed down over repeated sharpenings, the depth gauges (rakers) in front of each cutter need periodic adjustment too
- A dedicated depth gauge tool, matched to your chain’s specifications, shows you exactly how much to file each raker down
- Skipping this step eventually leads to a chain that feels sluggish despite freshly sharpened cutters
Check your depth gauges every few sharpening sessions, using the correct tool rather than guessing by eye.
Check Your Work
Once you’ve finished filing, a quick check confirms you did it right:
- Look for a bright, consistent, shiny edge across every cutter
- Rotate the chain by hand, checking that it moves smoothly around the bar
- Make a test cut on scrap wood, watching for clean chips rather than fine dust
- Confirm the cut runs straight, without drifting to either side
If everything checks out, you’ve got a properly sharpened chain ready for real work.
Common Mistakes to Avoid
A few pitfalls are worth watching for, especially as you’re still building this skill:
- Using the wrong file diameter for your chain’s pitch
- Inconsistent stroke count or pressure between cutters
- Dragging the file on the return stroke instead of lifting it clear
- Neglecting depth gauges over multiple sharpening sessions
- Rushing through the process rather than taking the time consistency requires
Most of these mistakes fade naturally with practice, so don’t be discouraged if your first few attempts aren’t perfectly even.
The Bottom Line
How do you sharpen a chainsaw chain with a file? Match your file diameter to your chain’s pitch, use a filing guide to maintain consistent angle, and apply the same stroke count and pressure across every cutter, pushing forward and lifting clear on the return. Check your depth gauges every few sessions, and test your results before trusting the chain to real work.
This is a genuinely learnable skill that gets faster and more intuitive every time you practice it, saving you shop trips and giving you real confidence in your own equipment.
Frequently Asked Questions
How do I sharpen a chainsaw chain with a file?
Match the file size to your chain’s pitch, use a filing guide for consistent angle, and apply even strokes to every cutter.
What size file should I use to sharpen my chain?
File diameter is matched to your chain’s specific pitch, listed on your chain’s packaging or owner’s manual.
Should I file in both directions or just one?
File on the forward push stroke only, lifting the file clear on the return rather than dragging it backward.
How many file strokes should each cutter get?
Use the same number of strokes and pressure on every cutter, since consistency matters more than an exact count.
Do I need a filing guide, or can I file freehand?
A filing guide is strongly recommended, since it makes maintaining a consistent angle far easier than freehand filing.
Practice the Technique Today
Grab the correct file for your chain, set up a filing guide, and work through your first full sharpening session with real attention to consistency. It won’t be perfect the first time, and that’s completely normal. A few practice sessions in, and hand-filing your own chain will feel like second nature — saving you time, money, and shop trips for years to come.

William C. Bozeman is a seasoned chainsaw expert and outdoor power tool enthusiast with over a decade of hands-on experience in tree cutting, forestry, and property maintenance. Having worked with leading chainsaw brands like Stihl, Husqvarna, and Oregon, Bozeman shares practical knowledge, safety tips, and honest reviews to help homeowners, DIYers, and professionals make informed decisions.
Explore Related posts:
 How Long Does a Battery-Powered Chainsaw Last? Runtime & Lifespan Explained
 Are Einhell Chainsaws Any Good? A Comprehensive Review
 Are Ryobi Chainsaws Any Good? Performance, Durability & Buyer’s Guide
 Can Chainsaws Cut Metal? Dangers, Damage & Safer Alternatives Explained
 Do Electric Chainsaws Need Oil? Everything You Must Know About Bar & Chain Lubrication
 How Long Of A Chainsaw Do I Need?
 How Many Times Can You Sharpen a Chainsaw Blade? Here’s What Actually Determines It
 Best One Hand Chainsaw: 5 Picks for Control, Precision and All-Day Comfort